
Introduction
The ecobee Smart Thermostat Premium thermostat was on sale for $239.98 on Amazon, which was close to an all time low. Enbridge was also offering a $125 rebate for geting a smart thermostat. I decided to take advantage of the sale and rebate and replace my old Honeywell thermostat.
The reason I went with the Premium version was that my system didn't have a C wire, and the Premium version has a power extender kit included.
Examining the Wiring
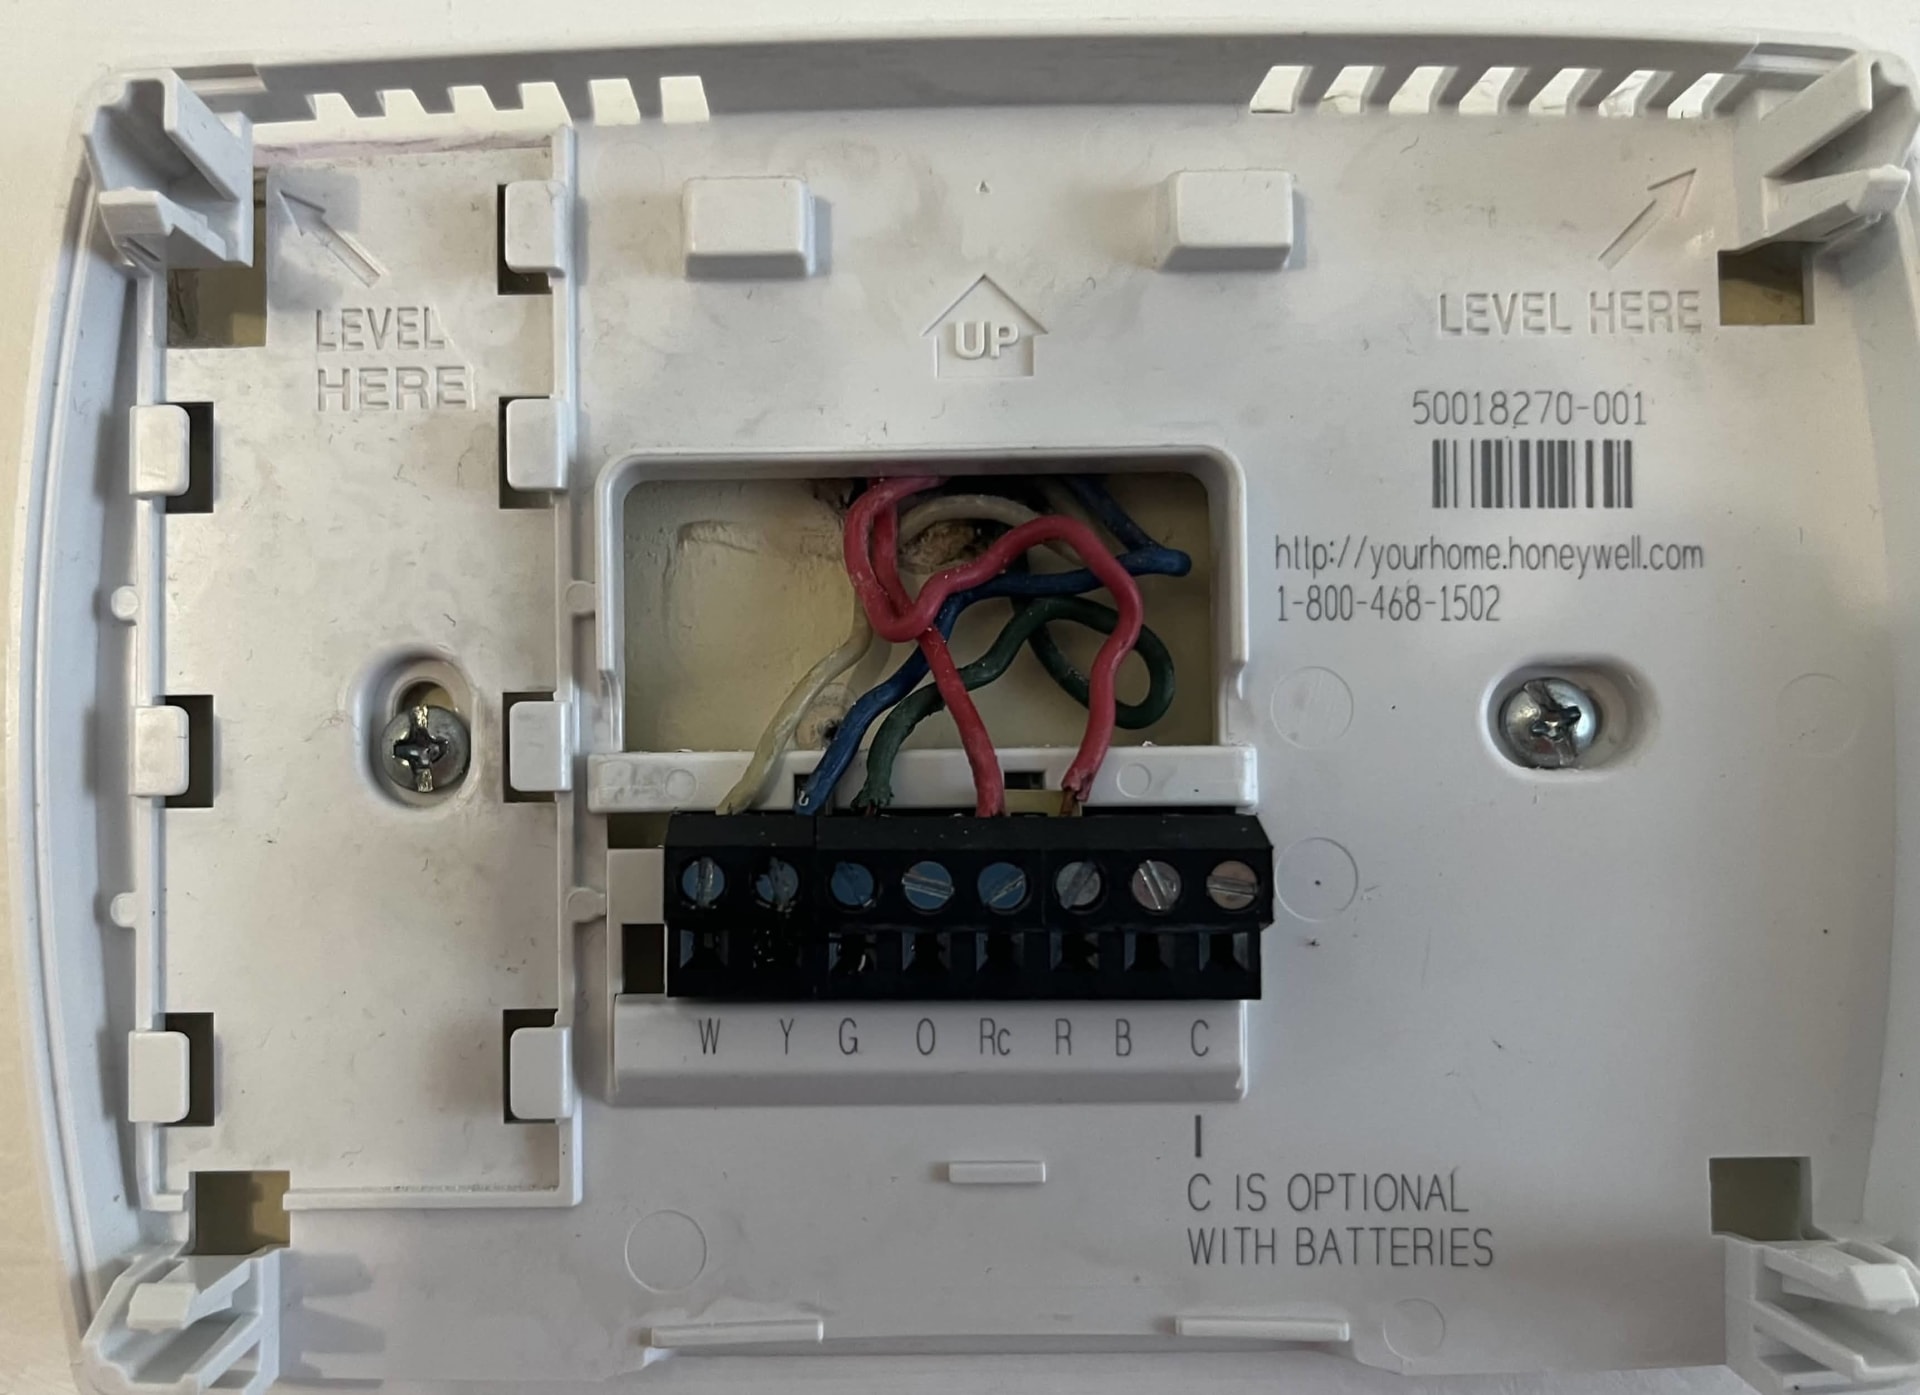
I removed the old thermostat and examined the wiring. I had a total of 5 wires, but the strange part was that there were two R wires. I had the following wires (with the typical functions in brackets):
- W (Heat) - White
- Y (Cool) - Blue
- G (Fan) - Green
- Rc (24V power) - Red
- R (24V power) - Red

I couldn't proceed with the installation, so I contacted ecobee support. They had me open up the furnace and take a picture of the wiring.

The support agent had me trace the two brown wire bundles and the black wire (white arrows in the picture) to the control board.

The black wire was spliced twice, once using a wire nut to convert to white and red (sheathed in a brown sheath). It was then spliced again using another wire nut to convert to a black and white wire (sheathed in a brown sheath), where only the black wire was connected.

It then went into the joist space and followed the ductwork out of the furnace room. The two brown wire bundles went into the joist space as well but in a different direction towards the breaker panel. I reconnected to another agent and they pointed out that the thermostat had an blue wire while the furnace had an orange wire. It was also strange that the two red wires had a jumper with each other. I was able to trace a splice in the drop ceiling where the entire bundle of wires was spliced (including converting the orange to blue). However, this didn't explain the two R wires.

I noticed in the drop ceiling that two brown wires went up and likely went to the thermostat. I pulled the wires further off the wall and found one of the brown wires, however the wires that came out of it were red and white (with white not in use). This didn't make sense as if it was the same black wire that was spliced twice, it should have been a black and white wire. The other four wires (white, blue, green, and red) matched the spliced bundle in the drop ceiling.

I theorized that the other red wire (with the unused white wire) was spliced once more between the furnace and the drop ceiling. I couldn't verify this as the ductwork was in the way and I couldn't get above it to check. I decided to purchase a wire tracer the next day at Princess Auto to trace the wires since I didn't want to blow the furnace panel by testing.
From what I could get so far, the wiring was strange and I couldn't understand why the installer would have done it this way.
Using the Wire Tracer
I ended up buying a much more expensive Klein wire tracer (VDV500-820) since the Princess Auto one was only rated for 30 cm. The Klein was rated for over 1,000 ft of transmission, which was more than enough for me. It was normally $153.00 at Home Depot, but I was able to price match with ITM Instruments for $109.99.
The instructions in the packaging weren't very easy to follow, so I used Tools And Tactics' video to learn how to use it. I connected one side to ground and lowered the volume of the toner until the strength light barely lit up. It was better explained in the video.
I grounded my black aligator clip by clipping it onto the bare metal of the furnace. I then connected the other (red) aligator clip to the black wire that was spliced twice. I noticed that I got continuity between ground and the black wire. Since I thought that the black wire led to the thermostat, I decided to unscrew the Rc wire and retest. The two red wires were jumped, so I want to isolate the wires. After disconnecting the Rc wire, I got no continuity between ground and the black wire. I continued to test the black wire and found that it was connected to the red Rc wire. I then tested the other red wire and found that it was connected to the R wire.
With the spliced black wire solved, I proceeded to test and verify the other wires in the thermostat. All the wires matched with expectations including the blue wire being connected to the orange wire in the furnace. The images below are mismatched (testing white and red wires) as I didn't take a photo of the other tests.


The wires were as shown in the photo below.

With the wiring confirmed, I contacted ecobee support again and they gave me more instructions.
Wiring the ecobee Thermostat
ecobee support informed me that we could convert the Rc wire into a C wire. I moved the black Rc wire in the furnance to the C terminal.

I then closed the furnace panel and proceeded to wire the thermostat. I wired it as follows (with the original thermostat colours and labels on the left and ecobee labels on the right):
- Red (R) -> Rc
- Red (Rc) -> C
- Green (G) -> G
- Blue (Y) -> Y1
- White (W) -> W1
With that done, I temporarily mounted the plate to the wall. I then turned on the breakers for the furnance and then attached the ecobee to the wall plate. The ecobee powered on and I proceeded on the screen to complete the install.
Finishing the Installation
I was prompted to confirm the power source. I selected "Only Rc is connected" as I didn't have an Rh wire connected.

I was then prompted to confirm the wiring. I selected "Yes" as all the wires were connected.

With the install complete, I proceeded to test the thermostat. I got to the Test Equipment screen by following the following navigation: Main Menu -> Gear Icon -> Settings -> Installation Settings -> Test Equipment. I tested the following:
- AC
- Heat
- Fan

I left some time between each test to ensure the system fully shut down before testing the next. All the functions seemes to work, so it was done.
I added the thermostat to HomeKit, and the install was finally (mostly) done.

I ended up installing the trim cover after I verified the thermostat was working.

Conclusion
Overall, the install was a bit more complicated that I expected due to the wiring. It was an interesting experience as I learned how to trace wires and the general wiring of my furnace. The tracer was an expensive tool, but I don't see how I could have fully confirmed the wiring without it. Since I used the Rc wire as a C wire, I technically could have used the Enhanced or Essentials verions of the thermostat. But, since I already installed the Premium version, I decided to keep it. I also got the following features that the other versions didn't have:
- Air quality sensor
- One SmartSensor
- Built-in Siri
- Smoke Alarm Detection
- Power Extender Kit (PEK)
The features already overlapped with other devices I had, but I could resell the PEK and SmartSensor if I wanted to. Overall, I am happy with the thermostat and the further integration with HomeKit.
Sept 9, 2026 Update
I noticed that my thermostat was reading around 2 Celsius higher than the other sensors in the same room. I ended up using the Temperature Correction setting to decrease the threshold by -1.9 Celsius. I also set up the SmartSensor and used that as the source for the temperatures.
Apparently, this was a known issue but I was disappointed that the news came from Reddit and that it started out of the box. It's frustrating that as a new user, the first thing I had to do was troubleshoot a bug.
Sept 17, 2026 Update
My thermostat version was updated to 4.10.8.392 and I noticed that the temperature reading was different. After removing the temperature correction, it was reading the same as the SmartSensor. I readded the thermostat as a source for temperature.
Read more

Hack the North 2026 - Badge's Best Friend
Solving badges best friend problem at Hack the North 2026

Re-greasing KitchenAid Mixer
Replacing grease on old KitchenAid mixer

Upgrading DSC System to DSC PC1832 and PK5500
Removing old DSC PC1500 panel to add EnvisaLink and Homekit